Set up MCP
The Dataedo MCP server can run in one of two modes. The difference comes down to where the server runs and how the AI client talks to it. Which one you pick depends mostly on the AI client you want to connect.
Hosted Mode (also called HTTP)
The server runs in a single, central place (for example, on a company server), and AI clients reach it over the internet through a URL. Users sign in through your Dataedo instance's standard login page, using any login method enabled there, so each person sees only the data they have permission to view.
Choose Hosted Mode when: you want a single shared server that several people or cloud-based AI tools can connect to. This is the right choice for Copilot Studio, Claude (the web/cloud version), and ChatGPT. See Setting up Hosted Mode.
Local Mode (also called stdio)
The server runs on your own computer, and the AI app on the same machine starts it and talks to it directly, without going over the internet. The MCP server and its connection to the AI app stay on your machine; only its calls to your Dataedo instance's API go over the internet. You sign in with a Personal Access Token instead of an organizational login.
Choose Local Mode when: you are using a desktop AI app on your own machine and want a quick personal setup. This is the right choice for Claude Desktop. See Setting up Local Mode.
Setting up Hosted Mode
Before you start, make sure you have:
- Docker installed on the machine that will host the server
- a publicly accessible URL for the MCP server (e.g.
https://mcp.yourdomain.com) - your Dataedo instance URL (e.g.
https://your-dataedo-instance.example.com)
Step 1: Start the server
The server ships as a Docker image, published on Docker Hub as dataedo/mcp. Run it however fits your environment (for example, with docker run or Docker Compose), using a specific published tag and exposing port 3000. Configure it through environment variables:
BACKEND_API_URL(required): the root URL of your Dataedo instance, without/apior a trailing slash (e.g.https://your-dataedo-instance.example.com)PUBLIC_URL(required): the publicly accessible URL of the MCP server itself (e.g.https://mcp.yourdomain.com)AUTH_SERVER_URL(optional): the public HTTPS URL of your Portal. Set it whenBACKEND_API_URLpoints at an internal address; otherwise, OAuth sign-ins fail with502while Personal Access Tokens keep working.
For the full list, see the Environment variables reference.
On startup, the server checks connectivity to your Dataedo instance and logs a warning if it is unreachable (it starts regardless). To verify that it is running, call the /health endpoint: it returns 200 when the Dataedo API is reachable and 503 otherwise.
In production, run the server behind an HTTPS reverse proxy and set the TRUST_PROXY environment variable so rate limiting applies to real client IPs.
Step 2: Register an OAuth application in Dataedo
AI clients sign users in through your Dataedo instance's login page. To enable this, each client needs OAuth credentials registered in Dataedo:
- In Dataedo Portal, go to Settings > OAuth applications and click Add application
- Name the application after the client you are connecting (e.g. Microsoft Copilot Studio). You can leave the redirect URIs empty for now and add your client's redirect URL later. If you need to register more than one redirect URI (for example, when several clients share the same OAuth application), separate them with a comma.
- After saving, copy the Client ID and Client secret. The secret is shown only once.
Connect a client
With the server running, connect an AI client over HTTP. Expand the section for the client you are connecting. Other MCP-compatible clients work too, so consult your provider's documentation for specifics.
Copilot Studio
Step 1: Add Dataedo as an MCP tool
- In Copilot Studio, open your agent and go to the Tools tab
- Click Add a tool > New tool > Model Context Protocol
- Enter the MCP server details:
- Server name: e.g. Dataedo
- Server URL:
https://<your-public-url>/mcp - Authentication: OAuth 2.0, configured manually
- Fill in the authentication fields using the credentials of the OAuth application you registered in Dataedo:
- Client ID: the application's Client ID
- Client secret: the application's Client secret
- Authorization URL:
https://your-dataedo-instance.example.com/oauth/authorize - Token URL template:
https://your-dataedo-instance.example.com/api/oauth/token - Refresh URL:
https://your-dataedo-instance.example.com/api/oauth/token - Scopes:
mcp offline_access
- Click Save. Copilot Studio generates a Redirect URL. Copy it.
Step 2: Add the redirect URL to your OAuth application
In Dataedo Portal, go back to Settings > OAuth applications, edit the application you registered, and add the redirect URL copied from Copilot Studio to its Redirect URIs. You do not need to restart the server.
Step 3: Test the agent
Ask the agent a question that reaches your catalog, for example: "Search for customer tables in my repository". On first use, Copilot Studio prompts you to sign in. Use your regular Dataedo login.
Step 4 (optional): Publish to M365 Copilot
To make the agent available inside M365 Copilot (Word, Teams, Outlook):
- In Copilot Studio, go to Channels and enable Microsoft 365 Copilot
- Publish the agent
- An M365 admin must approve the plugin in Microsoft 365 admin center > Integrated Apps
- Users with M365 Copilot licenses will see the plugin available in their Copilot experience
Claude apps (custom connector)
For Claude, Dataedo is added as a custom connector that points at your hosted MCP server. This is an organization-level setup, available on the Team and Enterprise plans: an Owner configures it once for the whole organization, rather than each user adding it individually. An Owner should:
- In your organization settings > Connectors, click Add custom connector
- For the Remote MCP server URL, enter your server's endpoint:
https://<your-public-url>/mcp - Open Advanced settings and fill in the OAuth Client ID and OAuth Client Secret. These are the credentials of the OAuth application you registered in Dataedo.
- Save the connector
Once it is enabled for your organization, Dataedo becomes available across all of your Claude clients (Claude Desktop, Claude Code, and Claude.ai) for any member who has the connector turned on and has signed in with an authorized Dataedo account. Each member authenticates once through the browser, using your Dataedo instance's standard login (including SSO).
The server must be reachable over HTTPS from the public internet. Claude connects to it from Anthropic's servers, so it cannot sit behind a VPN or private network. For more details, see Claude's guide to custom connectors with remote MCP.
ChatGPT (custom plugin)
For ChatGPT, Dataedo is added as a custom plugin that points at your hosted MCP server, then published to your workspace. See Connect ChatGPT for the full walkthrough.
Keep sign-ins across Portal restarts
By default, Dataedo Portal signs and encrypts the OAuth tokens it issues with keys that live only in Portal's memory. Every Portal restart generates new keys, which invalidates all issued tokens: every connected AI client is signed out, and each user has to authorize again the next time they use it. On IIS, this happens more often than you might expect, because with default settings the application pool recycles periodically and shuts down after a period of inactivity. Local Mode is not affected, as Personal Access Tokens do not depend on these keys.
Portal warns about this on the Settings > OAuth applications page and in the Portal log at startup. To keep sign-ins across restarts, configure two PKCS#12 (.pfx) certificates in Portal: one to sign tokens and one to encrypt them. Self-signed certificates are perfectly fine here: AI clients fetch the public key directly from Portal over HTTPS, so the certificate's issuer is never evaluated.
First, generate the two certificates, for example, with PowerShell on Windows:
$signing = New-SelfSignedCertificate -Subject "CN=Dataedo OAuth Signing" `
  -KeyUsage DigitalSignature -KeyAlgorithm RSA -KeyLength 2048 `
  -CertStoreLocation Cert:\CurrentUser\My -NotAfter (Get-Date).AddYears(5)
$encryption = New-SelfSignedCertificate -Subject "CN=Dataedo OAuth Encryption" `
  -KeyUsage KeyEncipherment -KeyAlgorithm RSA -KeyLength 2048 `
  -CertStoreLocation Cert:\CurrentUser\My -NotAfter (Get-Date).AddYears(5)

$password = ConvertTo-SecureString -String "<choose-a-password>" -Force -AsPlainText
Export-PfxCertificate -Cert $signing -FilePath oauth-signing.pfx -Password $password
Export-PfxCertificate -Cert $encryption -FilePath oauth-encryption.pfx -Password $password
or with OpenSSL on Linux:
openssl req -x509 -newkey rsa:2048 -sha256 -days 1825 -nodes \
  -keyout signing.key -out signing.crt -subj "/CN=Dataedo OAuth Signing"
openssl pkcs12 -export -out oauth-signing.pfx -inkey signing.key -in signing.crt

openssl req -x509 -newkey rsa:2048 -sha256 -days 1825 -nodes \
  -keyout encryption.key -out encryption.crt -subj "/CN=Dataedo OAuth Encryption"
openssl pkcs12 -export -out oauth-encryption.pfx -inkey encryption.key -in encryption.crt
Then point Portal to the files. Expand the section for your deployment type:
Windows (IIS)
-
Place both
.pfxfiles in a location the application pool identity can read, for exampleC:\Dataedo Web\Certificates\ -
Edit the
appsettings.jsonof the API application (by defaultC:\Dataedo Web\Applications\API\appsettings.json) and fill in theOAuthServersection:"OAuthServer": {
"SigningCertificatePath": "C:\\Dataedo Web\\Certificates\\oauth-signing.pfx",
"SigningCertificatePassword": "<password>",
"EncryptionCertificatePath": "C:\\Dataedo Web\\Certificates\\oauth-encryption.pfx",
"EncryptionCertificatePassword": "<password>"
} -
Restart the application pool
Docker
Mount the .pfx files into the backend container (for example, at /oauth-certs, read-only) using whatever mechanism your deployment uses, and point these environment variables to them:
DATAEDO_OAUTH_SERVER_SIGNING_CERTIFICATE_PATH=/oauth-certs/oauth-signing.pfx
DATAEDO_OAUTH_SERVER_SIGNING_CERTIFICATE_PASSWORD=<password>
DATAEDO_OAUTH_SERVER_ENCRYPTION_CERTIFICATE_PATH=/oauth-certs/oauth-encryption.pfx
DATAEDO_OAUTH_SERVER_ENCRYPTION_CERTIFICATE_PASSWORD=<password>
Note that this is a different mount from the custom SSL certificates /certs mount, which only adds public CA certificates to the system trust store. Recreate the backend container to apply the change.
Replacing the certificates invalidates tokens issued with the previous ones, so connected AI clients ask users to authorize one more time. If a configured certificate cannot be loaded (wrong path or password, or a certificate without a private key), Portal does not start, and the exact reason is written to the Portal log.
Setting up Local Mode
Before you start, make sure you have:
- Node.js 20 or later
- your Dataedo instance URL (e.g.
https://your-dataedo-instance.example.com)
Generate a Personal Access Token
A Personal Access Token (PAT) authenticates you when you run the server locally. You can generate it directly from your profile in Dataedo Portal.
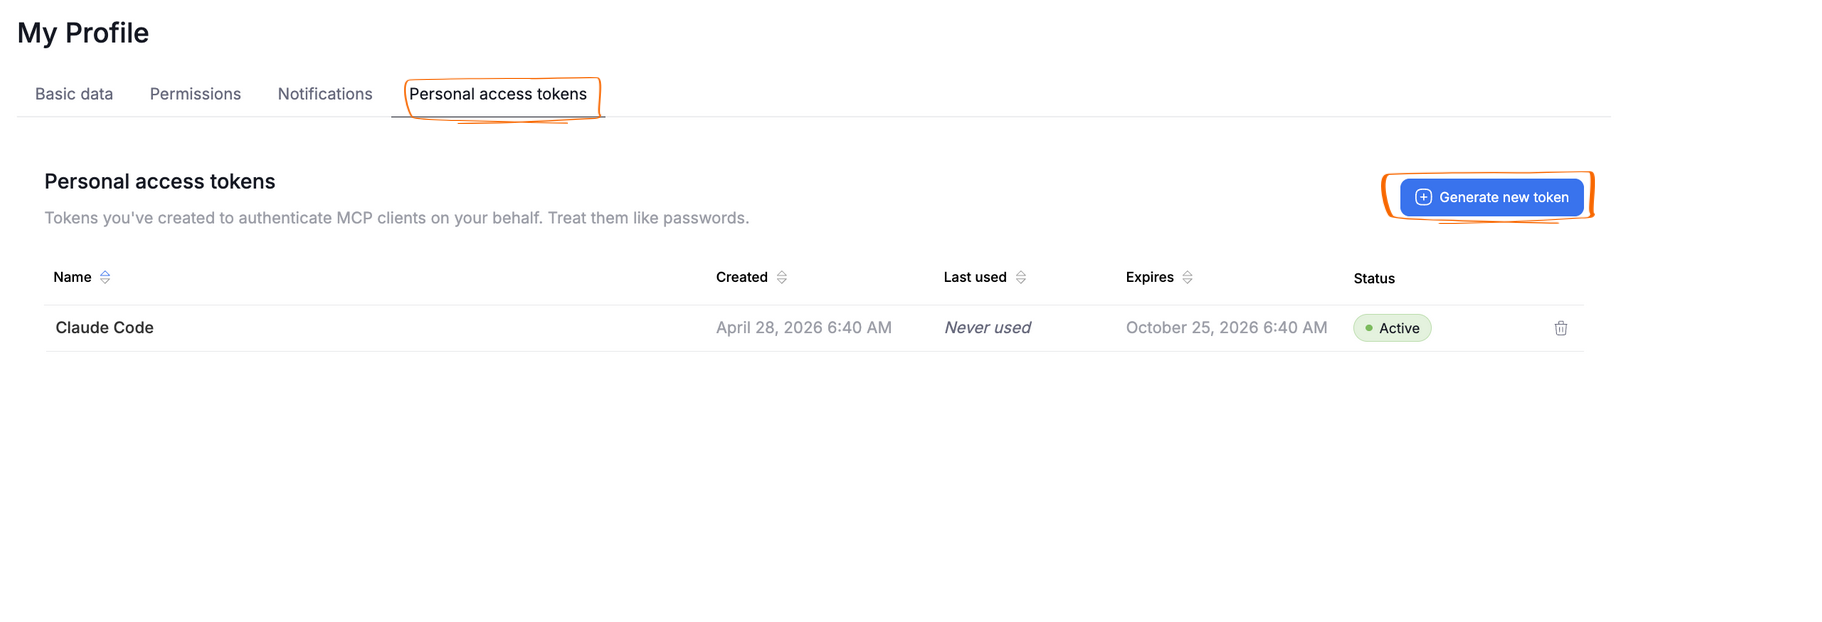
Navigate to your profile by clicking your username in the top-right corner of the screen. Then open the Personal access tokens tab and click Generate new token.
A pop-up will appear. You will be asked to name your token. You can also set expiration settings, deciding when (and if) the token will expire and no longer be usable.
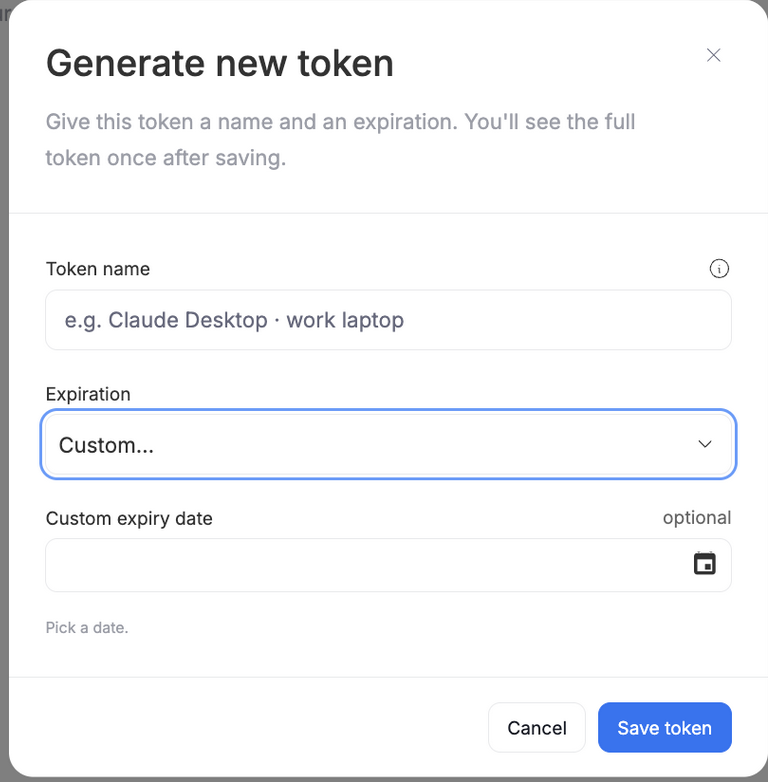
After you create a token, its secret is displayed only once. Make sure to copy it and store it safely.
If you want to force a token to expire before its set date, you can use the trash bin icon next to the token's name. This revokes it: the token disappears from the list of your Personal Access Tokens, and it is no longer usable.
Connect a client
In Local Mode, your AI client launches the server by itself through the dataedo-mcp npm package. The configuration is the same across all clients, so the full process is explained in the dataedo-mcp npm package documentation. It contains ready-made configurations for Claude Code, Claude Desktop, Cursor, and Copilot CLI, the required environment variables, troubleshooting, and the full list of tools the server exposes.
Use the Personal Access Token as the DATAEDO_PAT value in those configurations.
For a full list of server environment variables, see the Environment variables reference.

