Connecting to Azure Cosmos DB
This article explains how to connect Dataedo to Azure Cosmos DB and import metadata.
Importing Metadata in Dataedo Portal
Entry point
To start the Metadata Import flow, make sure you have the Connection Manager role.
Then navigate to:
Connections → Add new connection
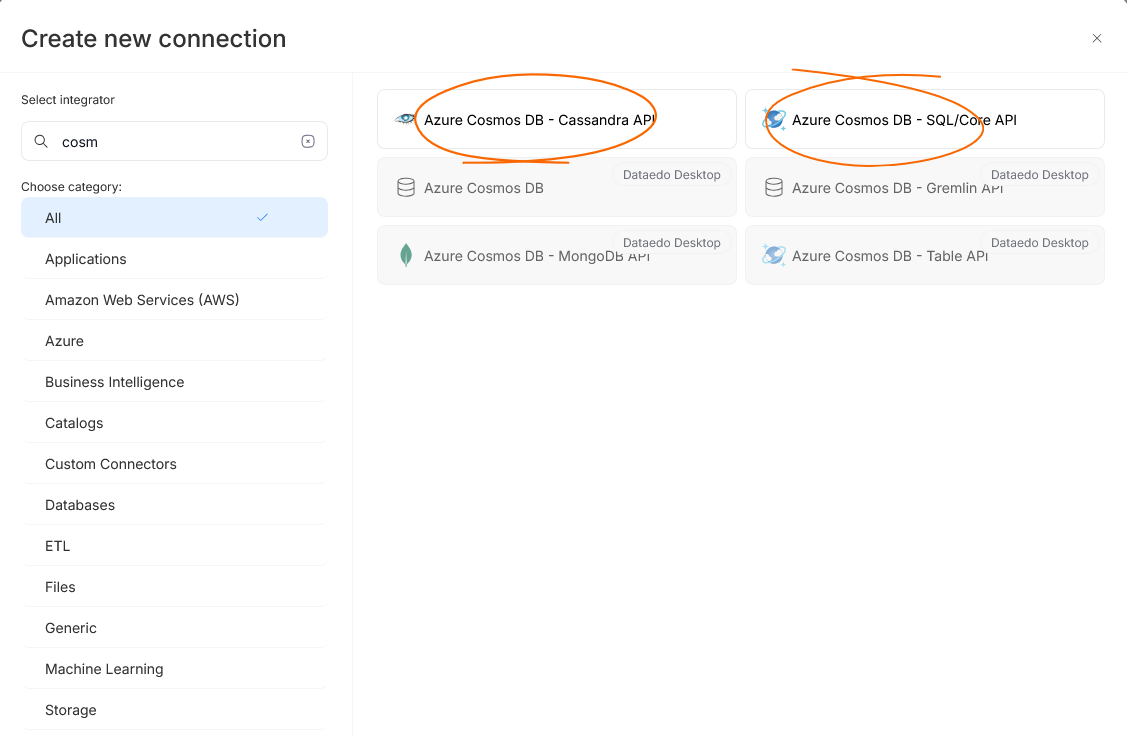
Search for Azure Cosmos DB and select the API configured for your instance. Dataedo Portal currently supports:
- Azure Cosmos DB – SQL/Core API
- Azure Cosmos DB – Cassandra API
This will open the import wizard described in the following steps.
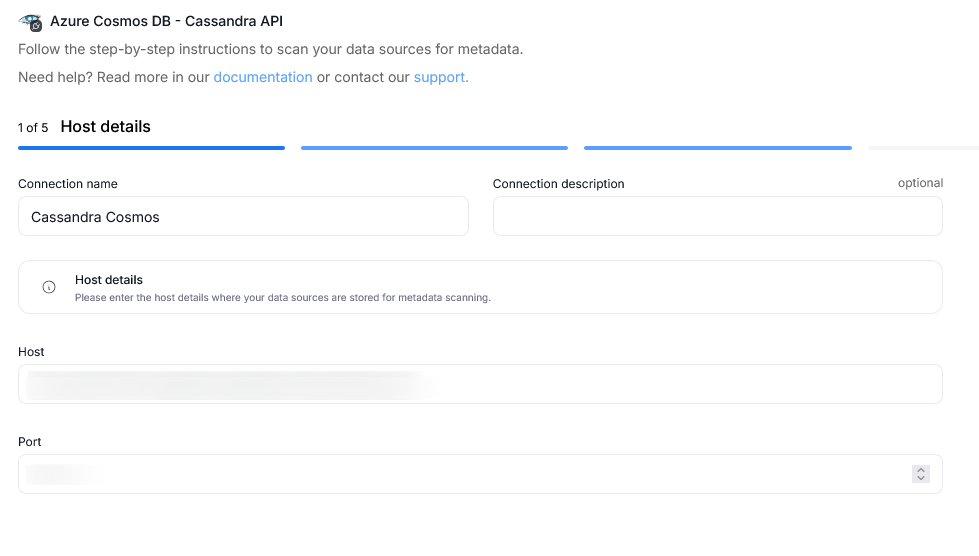
Step 1. Host details
Provide the name of Connection, the required connection details, and an optional description.
A Connection in Dataedo represents a saved configuration for accessing a data source.
It can be reused for future imports and scheduling.
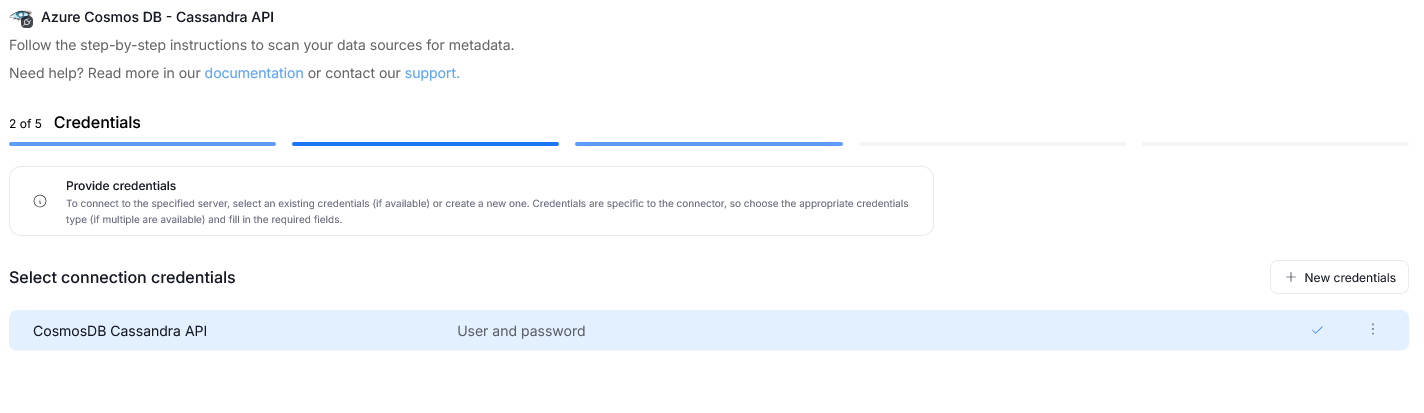
Step 2. Credentials
Choose credentials from the list of existing ones available for the selected connector, or add new credentials.
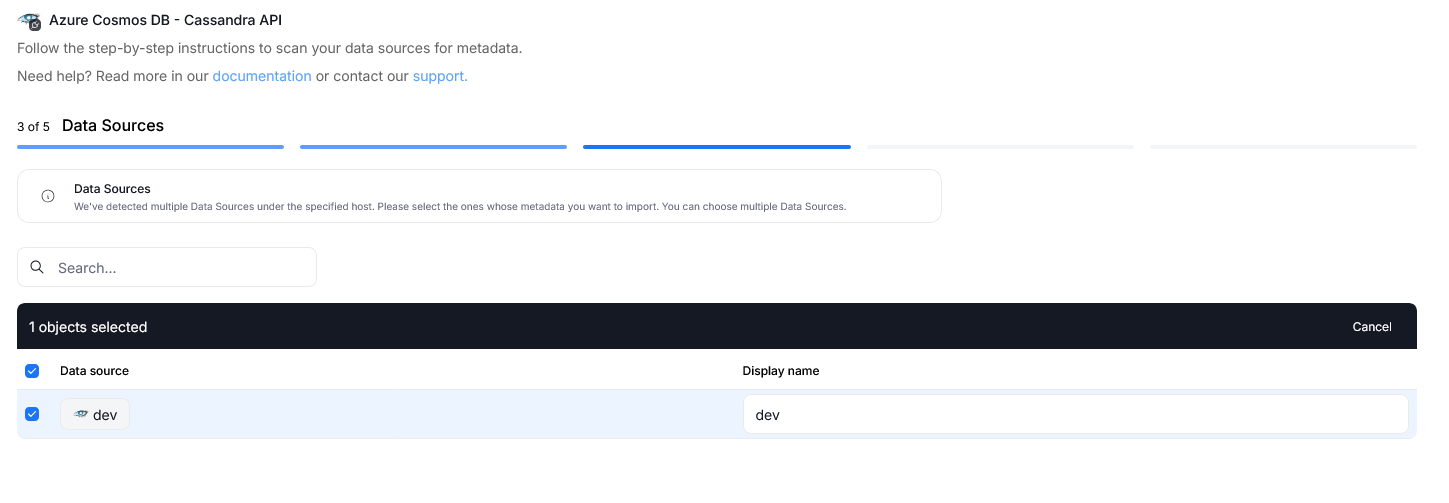
Step 3. Data Sources
During one import you can read the metadata of up to 20 data sources. You can reuse the same connection to import more sources later.
- The Portal will display all databases accessible with the provided credentials.
- You can select multiple databases at once and use the search box to narrow down results.
- Each selected database should be given a Title, which will be visible in Dataedo.
- At this step, the Portal also retrieves the number of assets in each source.
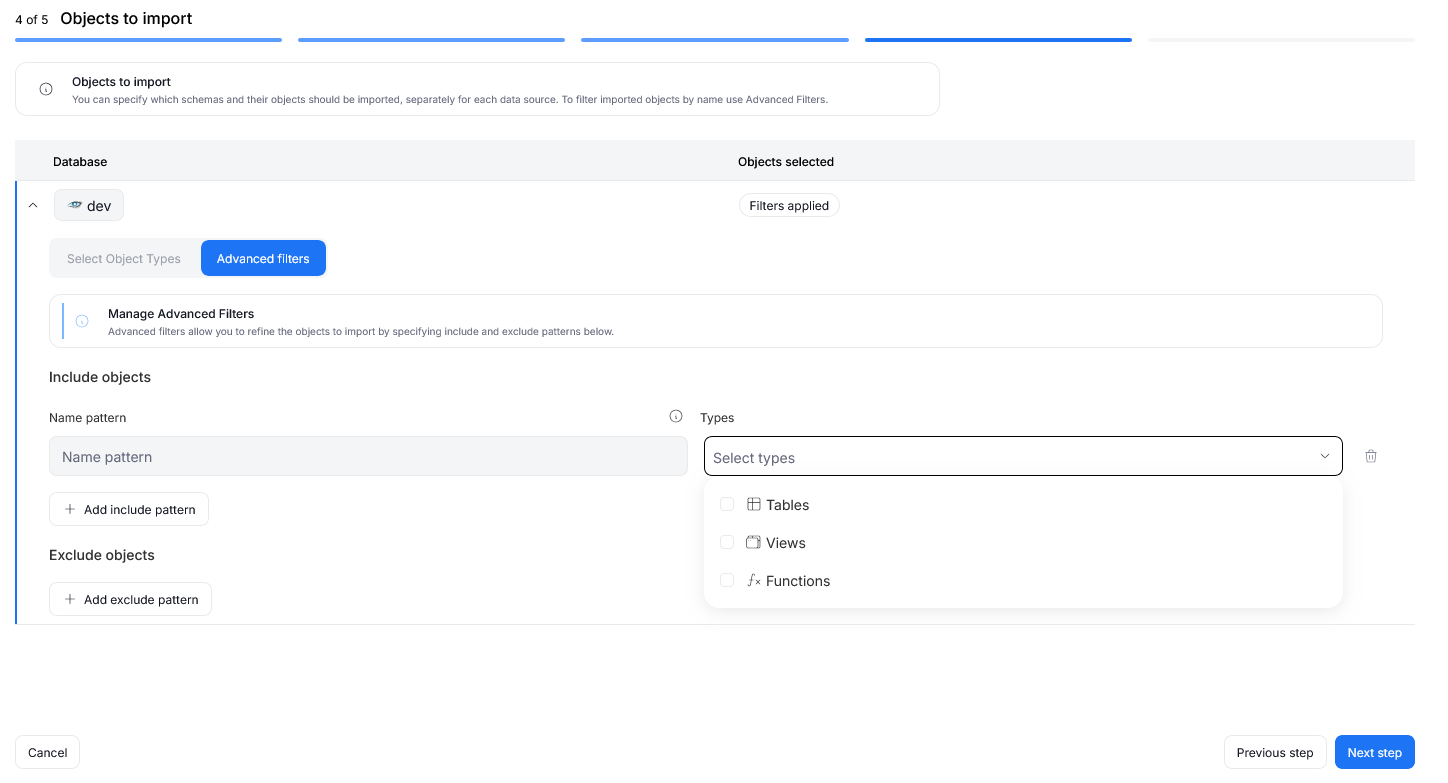
Step 4. Objects to import
For each selected database, you can refine which objects to import:
- Select schemas and object types (tables, views, procedures, etc.).
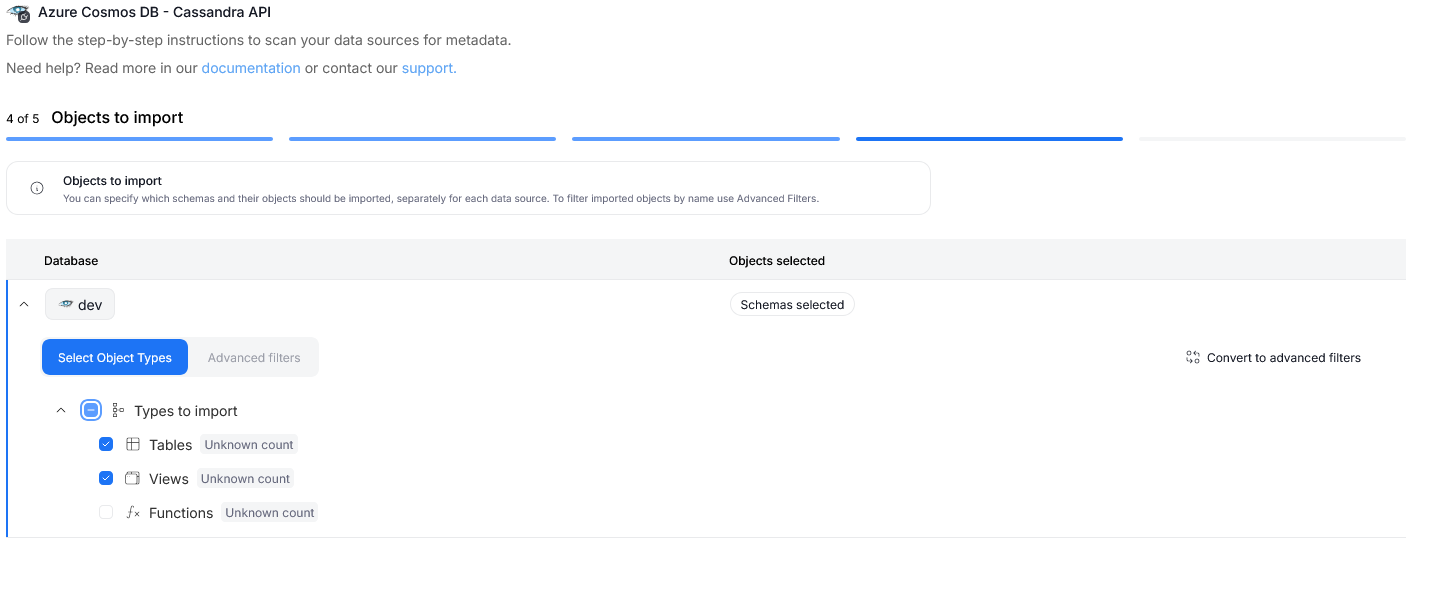
- Use Advanced filters to include or exclude objects with:
- schema patterns
- name patterns
Step 5. Schedule
Configure scheduling options for each source individually:
- Define tasks you want to schedule (Metadata Import).
- Run daily, on selected weekdays, or on specific days of the month.
- Choose an exact time of execution.
- Task state:
Active– the task will run as scheduled.Draft– the task is saved but not executed until switched to Active.
- Run immediately – when checked, the task will also be executed right after clicking
Create connection.
Only one source in a metadata import can have Run immediately selected.
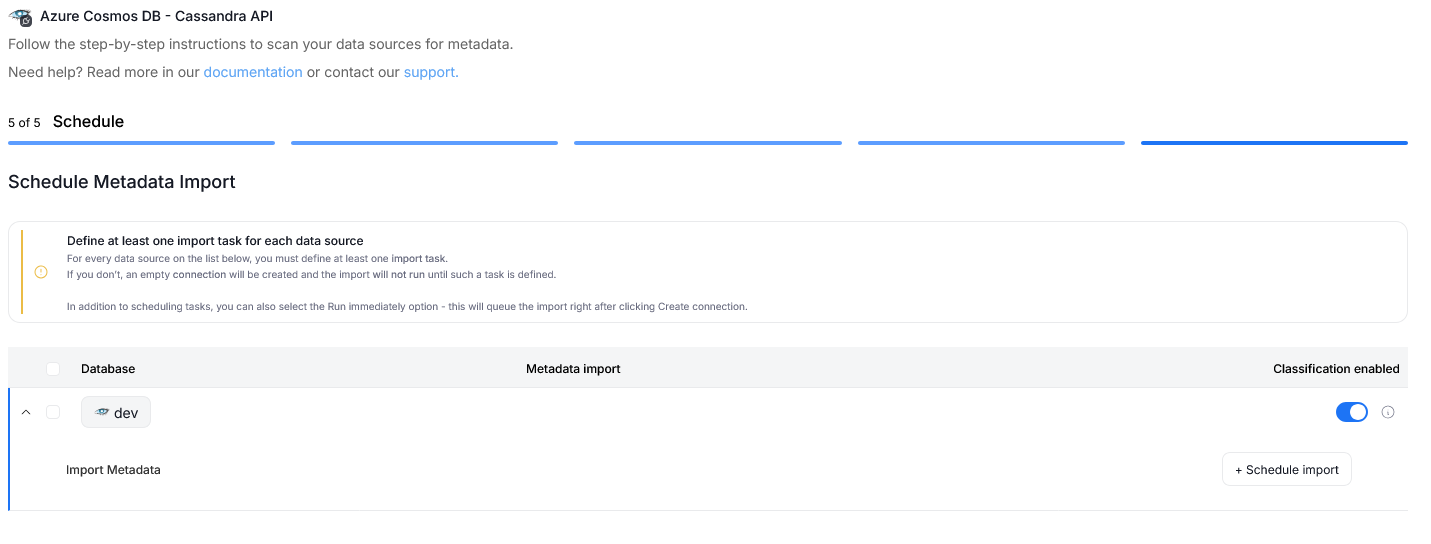
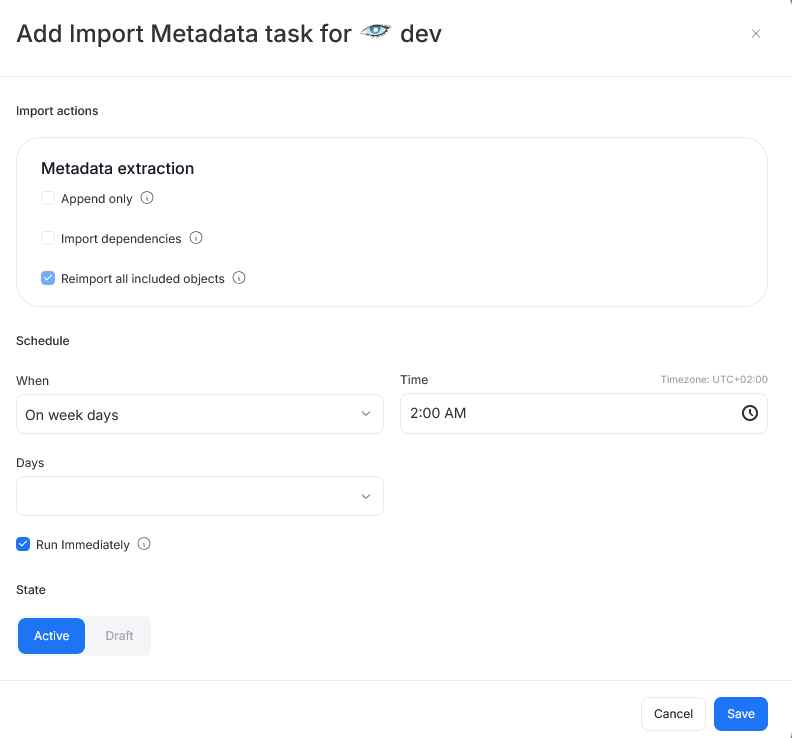
You must configure at least one import task in the schedule section.
If you skip this, an empty database will be created and no metadata will be imported.
Importing Metadata in Dataedo Desktop
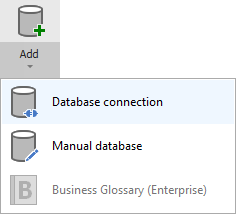
To connect to Azure Cosmos DB create new documentation by clicking Add documentation and choosing Database connection.
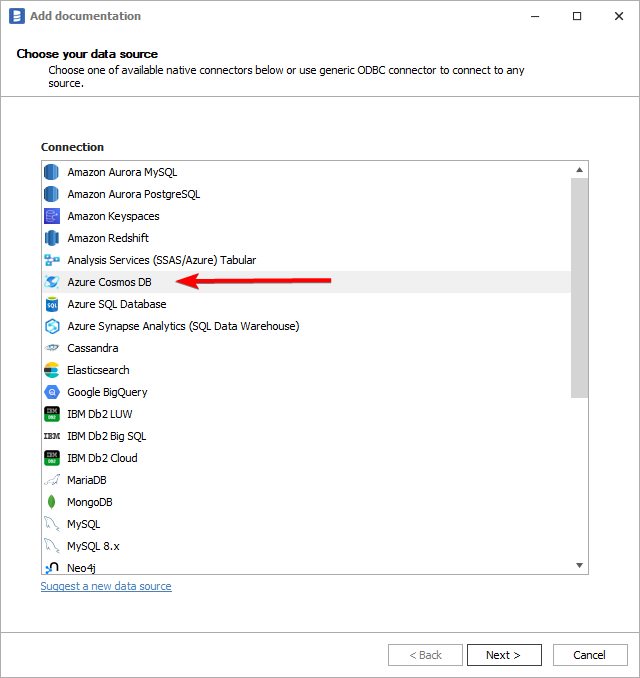
On the Add documentation window choose Azure Cosmos DB:
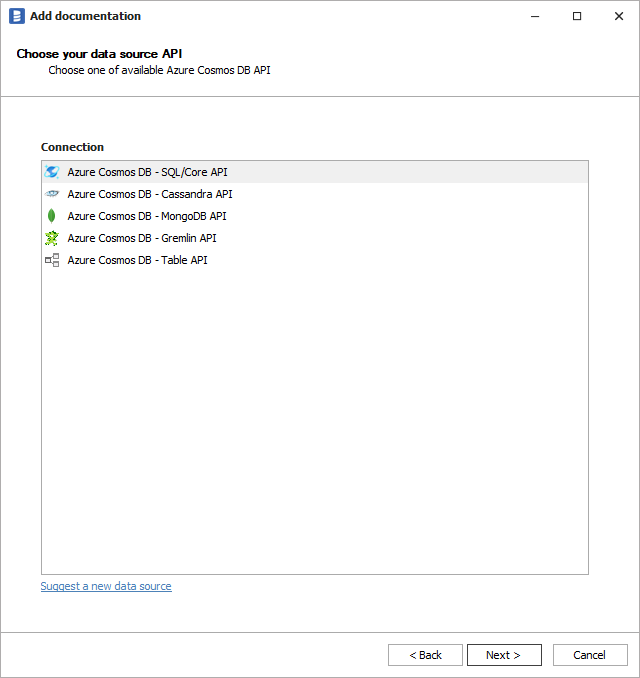
Then you need to select API configured for your Azure Cosmos DB (see Azure Cosmos DB APIs):
Connection details
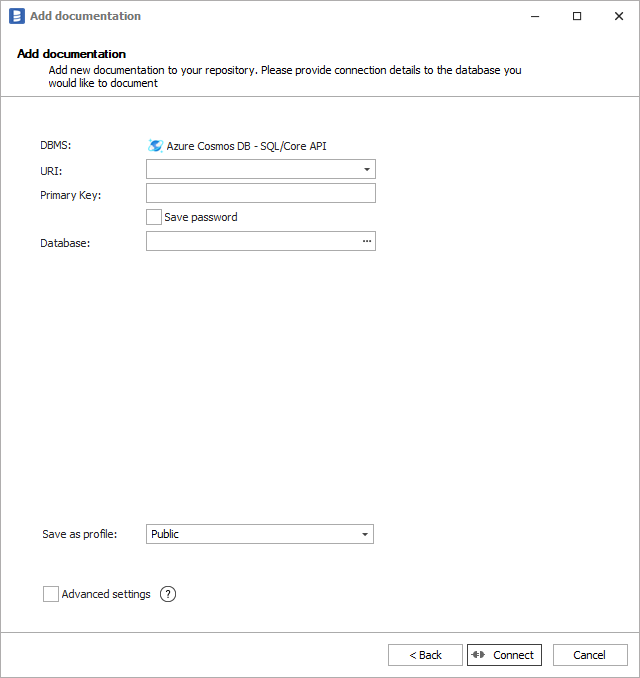
Azure Cosmos DB - SQL/Core API
Provide connection details for Core API:
- URI - API endpoint URI,
- Primary Key - unique secret key granting access to a Cosmos DB resource (see Azure Core API Secret key),
- Database - database to be documented. You can expand the list of available databases by clicking [...] button.
How to get connection details in Azure Portal
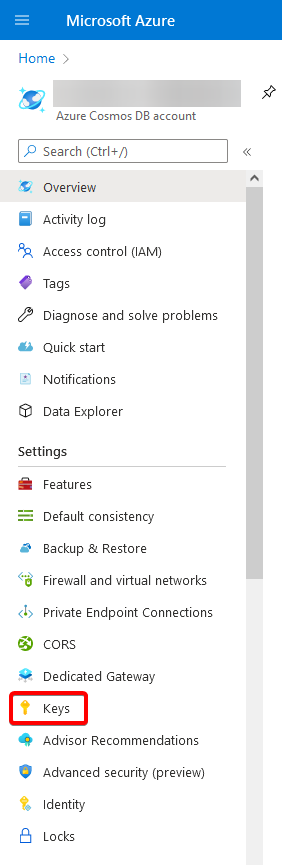
First, find Azure Cosmos DB resource and select your Azure Cosmos DB Core API account. Then on the left-hand side menu, under Settings open Keys tab:
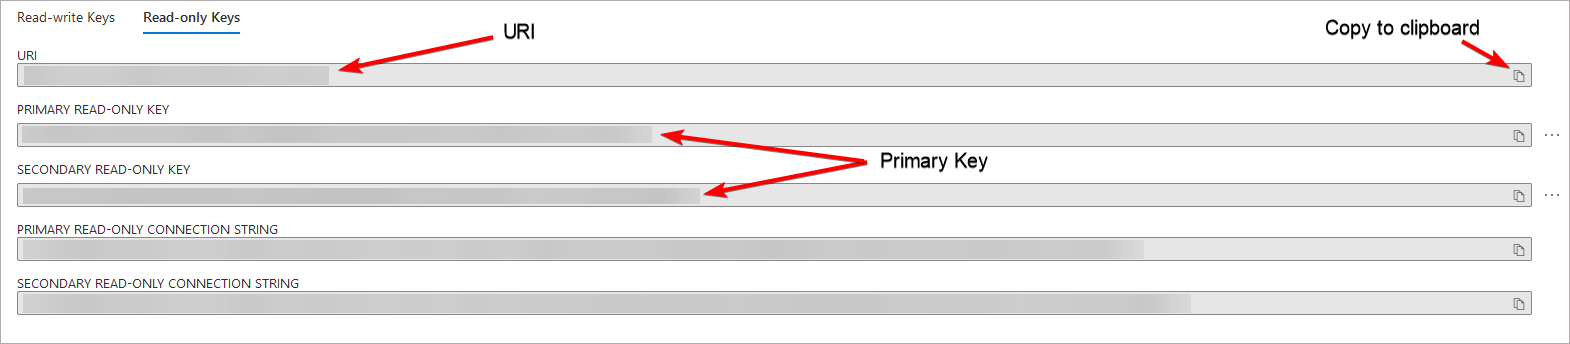
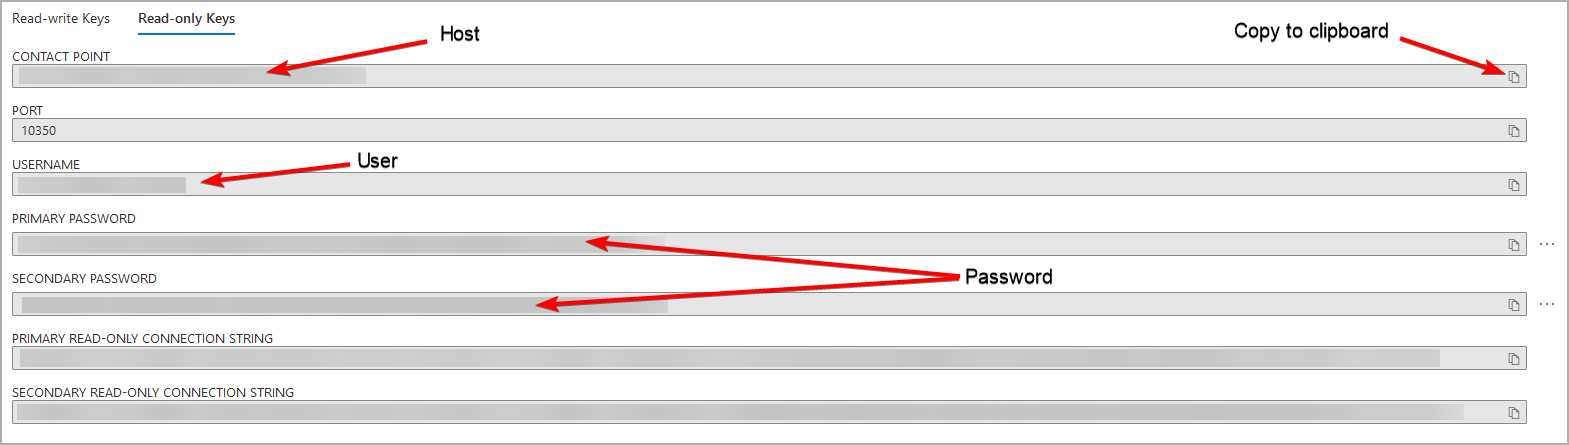
Under Keys, you should have two tabs - Read-write keys or Read-only keys. For documenting purposes Read-only keys are sufficient. Furthermore, in Dataedo as a primary key you can use either Primary Key or Secondary Key.
You can copy the selected value to the clipboard by clicking Copy to clipboard icon, and paste values in Dataedo connection window.
Azure Cosmos DB - Cassandra API
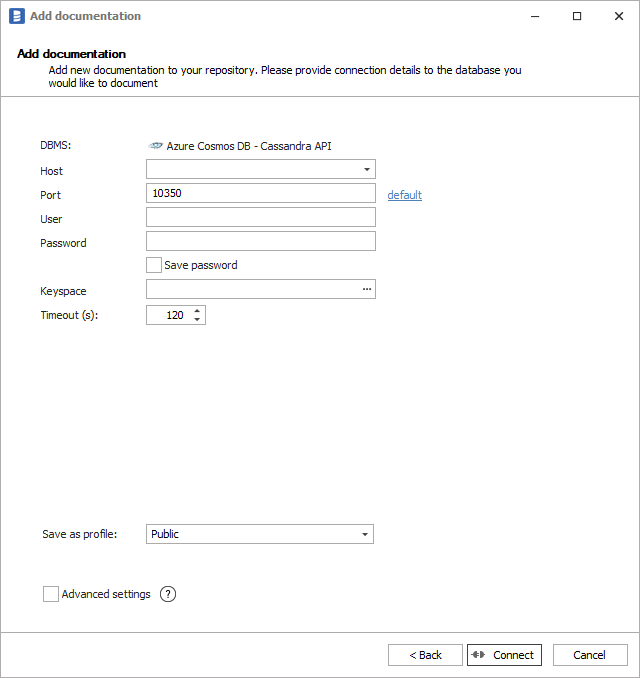
Provide connection details for Cassandra API:
- Host - API endpoint URI,
- Port - Cassandra API port. By default, it's 10350,
- User - Cassandra API username,
- Password - password (primary or secondary),
- Keyspace - keyspace to be documented. You can expand the list of available keyspaces by clicking [...] button.
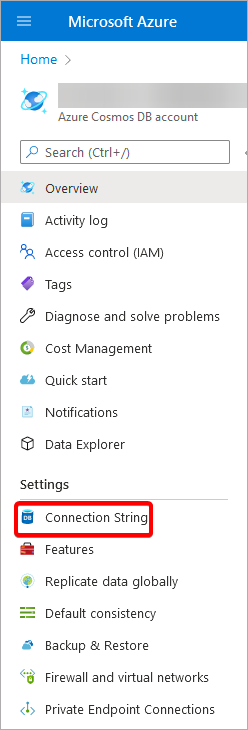
How to get connection details in Azure Portal
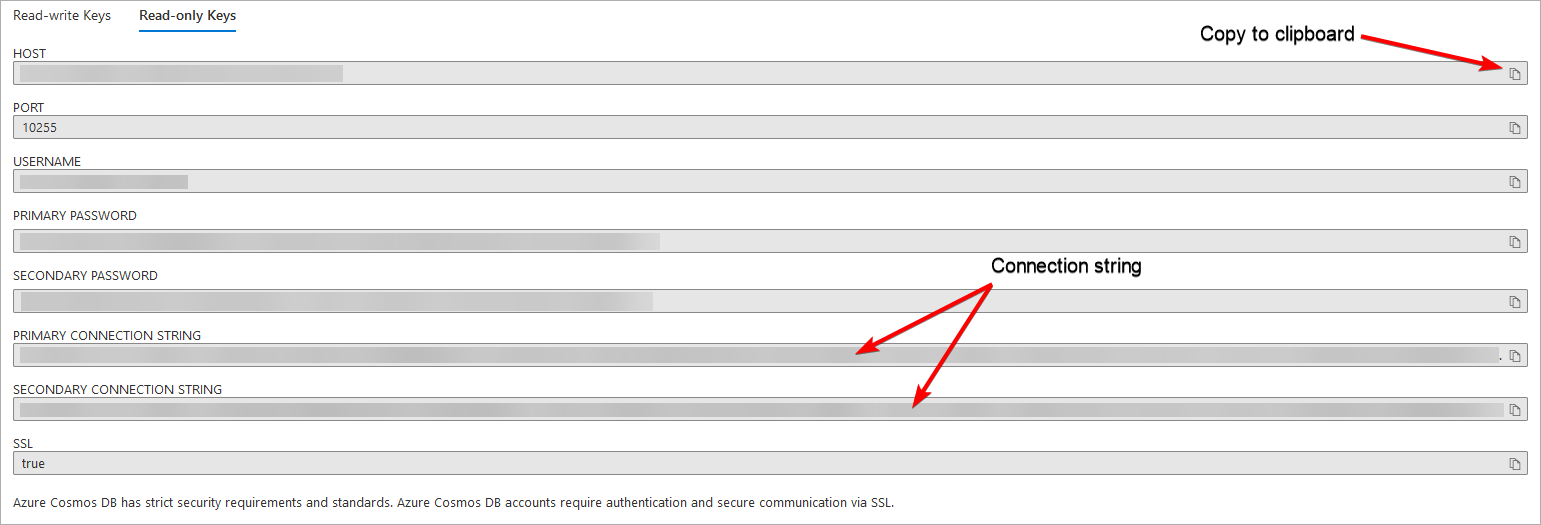
First, find Azure Cosmos DB resource and select your Azure Cosmos DB Cassandra API account. Then on the left-hand side menu, under Settings open Connection String tab:
Under Connection String, you should have two tabs - Read-write keys or Read-only keys. For documenting purposes Read-only keys are sufficient. Furthermore, in Dataedo as a password you can use either Primary Password or Secondary Password.
You can copy the selected value to the clipboard by clicking Copy to clipboard icon, and paste values in Dataedo connection window.
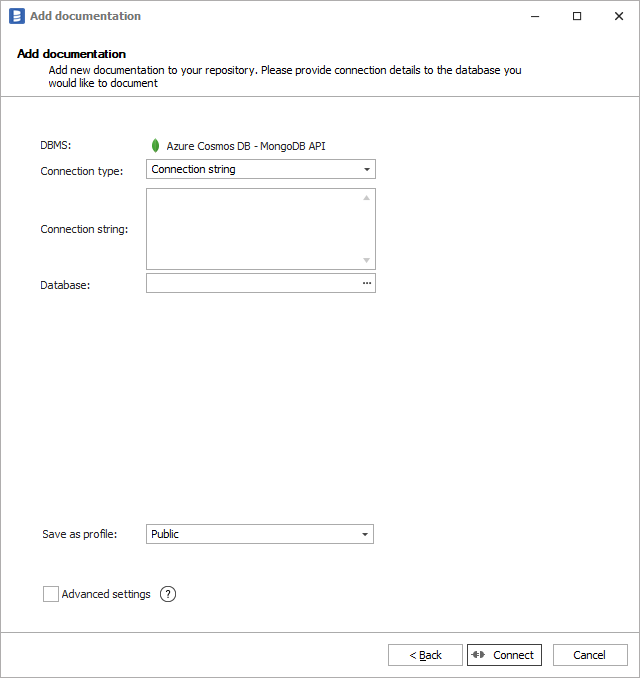
Azure Cosmos DB - MongoDB API
First, you need to select connection type - either Connection string or Values. We recommend the first option as the full connection string is available in Azure Portal. Then you need to provide connection details:
- Connection string,
- Database - database to be documented. You can expand the list of available databases by clicking [...] button.
How to get connection details in Azure Portal
Find Azure Cosmos DB resource and select your Azure Cosmos DB MongoDB API account. Then on the left-hand side menu, under Settings open Connection String tab:
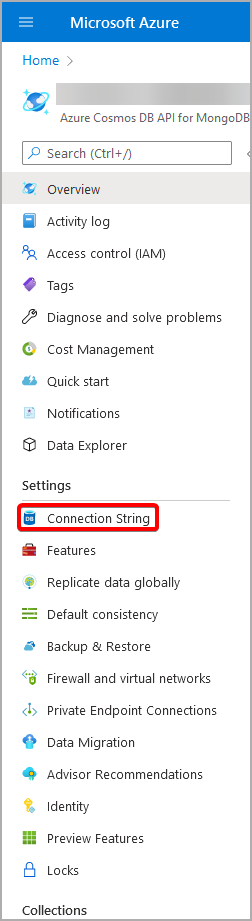
Under Connection String, you should have two tabs - Read-write keys or Read-only keys. For documenting purposes Read-only keys are sufficient. Furthermore, in Dataedo as a connection string you can use either Primary Connection String or Secondary Connection String.
You can copy the selected value to the clipboard by clicking Copy to clipboard icon, and paste values in Dataedo connection window.
Azure Cosmos DB - Gremlin API
Documenting Azure Cosmos DB with Gremlin API is currently not supported by Dataedo.
Azure Cosmos DB - Table API
Documenting Azure Cosmos DB with Table API is currently not supported by Dataedo.
Importing metadata
When the connection is successful, Dataedo will read objects and show a list of objects found. You can choose which objects to import. You can also use advanced filter to narrow down the list of objects.
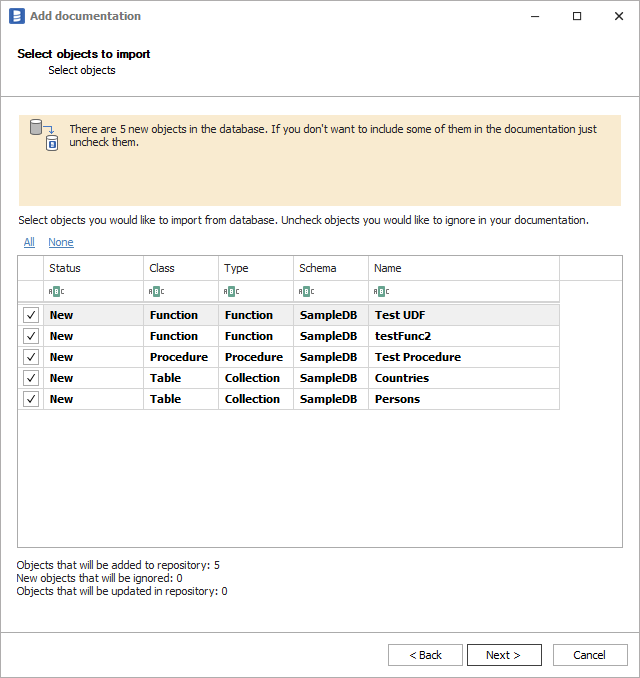
Confirm the list of objects to import by clicking Next.
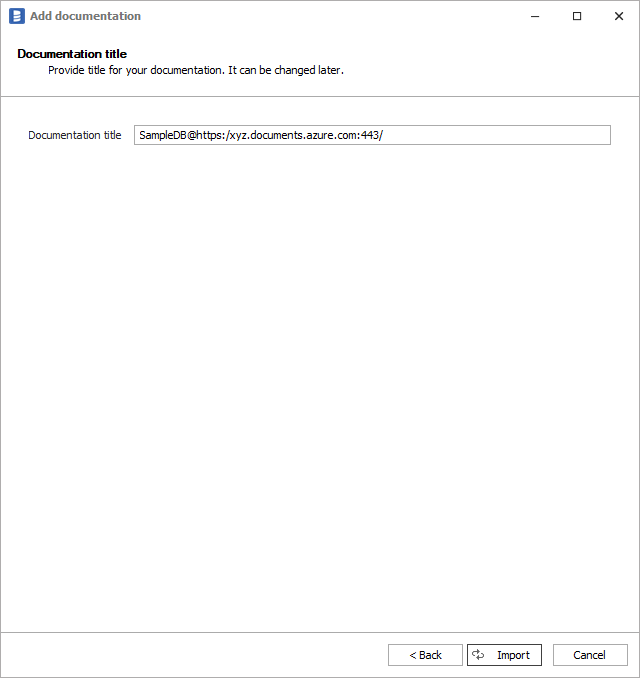
The next screen allows you to change the default name of the documentation under which your schema will be visible in the Dataedo repository.
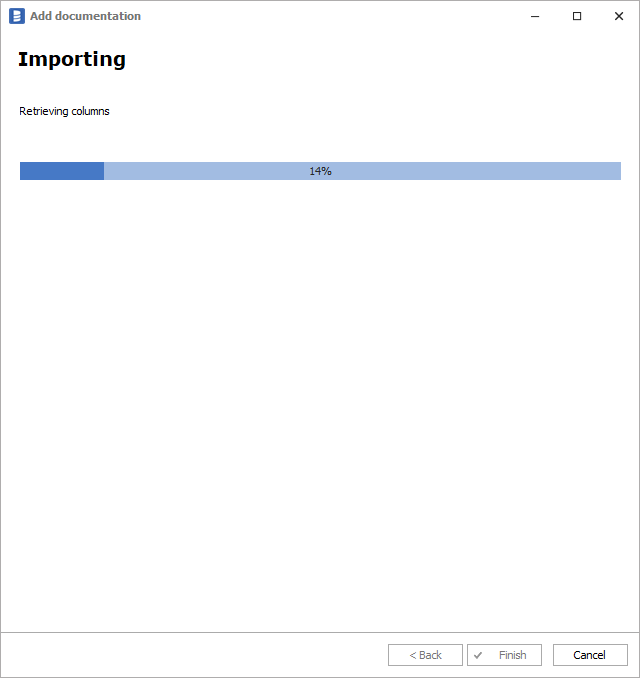
Click Import to start the import.
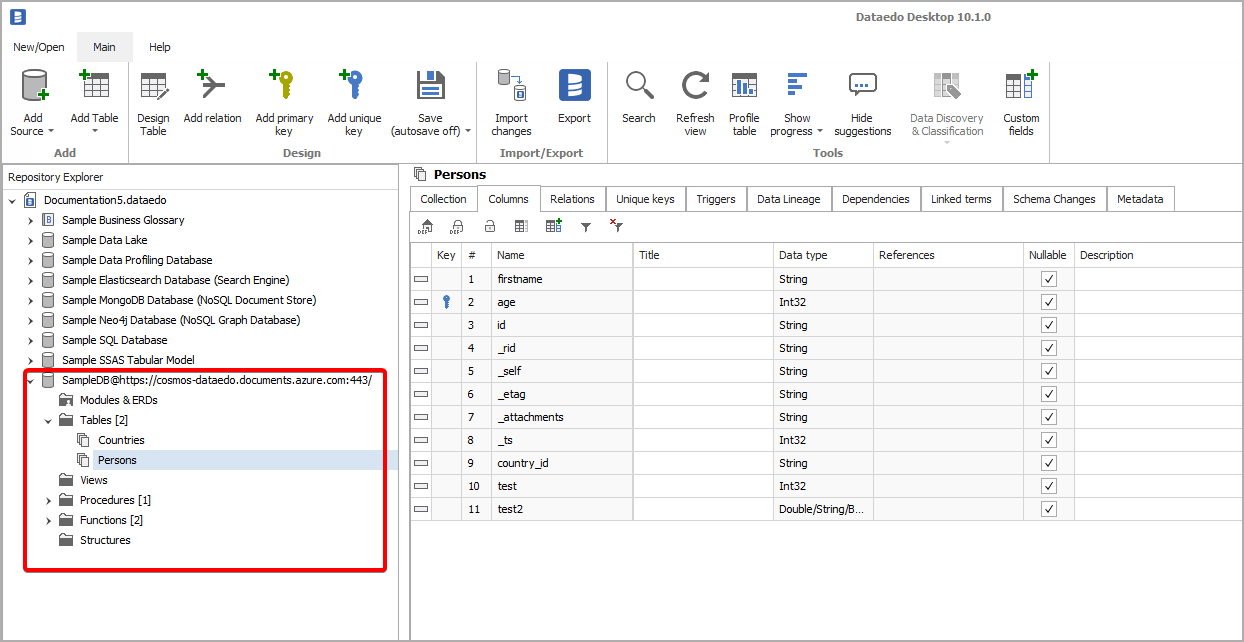
Outcome
Your database/keyspace has been imported to new documentation in the repository.