Configuring task timeouts
Dataedo Agent handles the execution of tasks related to your metadata. The more tasks there are, the bigger the queue can get. To ensure that all tasks are executed in a timely manner, and unexpected errors do not interfere with your planned schedule, tasks have timeouts — a maximum execution time, after which the task is aborted if it has not finished. This lets the Agent move on to the next queued task without holding up the execution queue.
You might want to change the timeouts — for example, make them longer if you are working with an unexpectedly large database, or shorten them to ensure fast execution and skip over problematic sources quickly.
Global configuration
The default timeout values are:
- 420 seconds for import and Data Quality & Classification tasks
- 120 seconds for Data Profiling
- 40 seconds for Data Discovery (background tasks related to functions like testing a connection or identifying a list of databases in a data source)
All these values, except for Data Discovery, can be modified in Portal by admins. To do so, go to Settings>System Settings>Agent and scroll down to the Data source timeouts section.
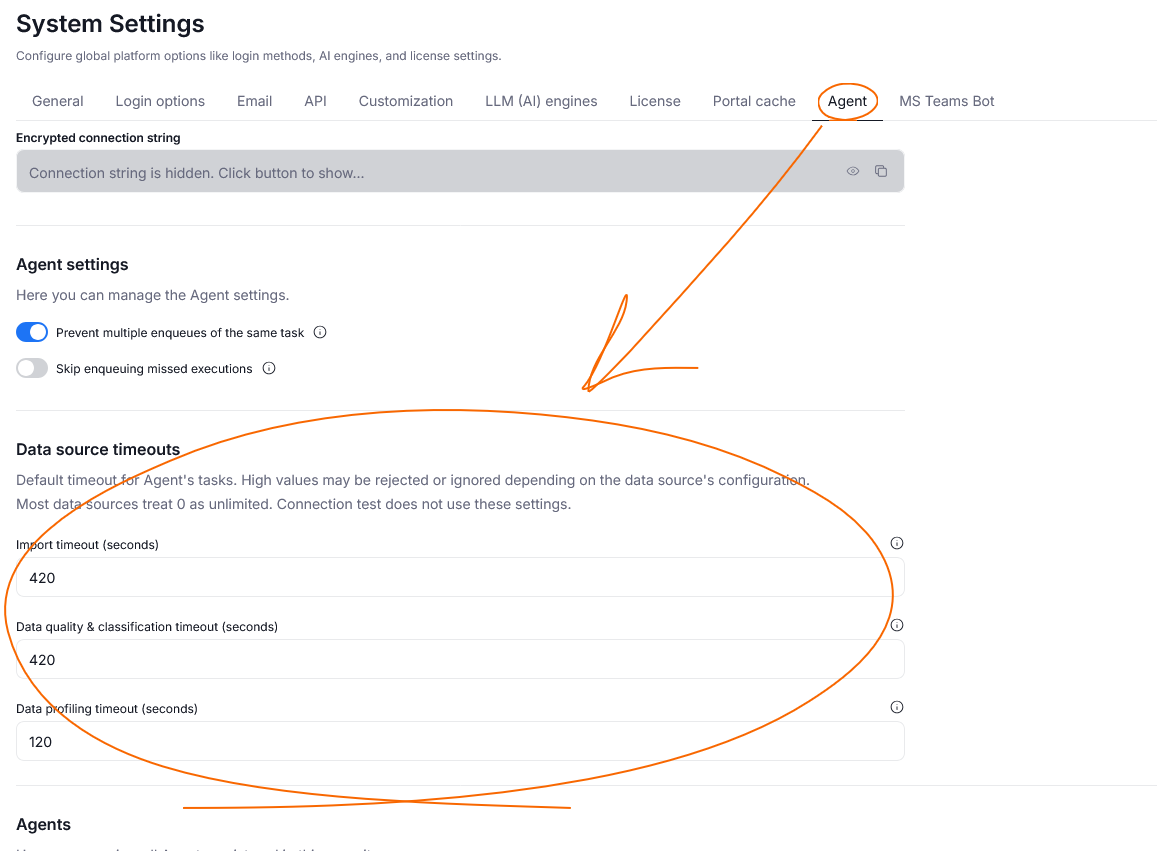
For each task type, you can define a new timeout value in seconds. Once you have finished, remember to click Save. Those new values will be applied to all your tasks, unless you have explicitly defined an exception (individual timeout) for certain sources.
Global values in repository
We advise against increasing discovery timeouts, as it can lead to unexpected crashes
Global timeout values can also be modified directly in the Dataedo repository. To do so, navigate to dbo.configuration and look for the following keys (all values are in seconds):
DATASOURCE_IMPORT_TIMEOUT_IN_SECONDS— the timeout for Metadata Import tasksDATASOURCE_DATA_QUALITY_TIMEOUT_IN_SECONDS— the timeout for Data Quality and Data Classification tasksDATASOURCE_DATA_PROFILING_TIMEOUT_IN_SECONDS— the timeout for Data Profiling tasksDATASOURCE_DISCOVERY_TIMEOUT_IN_SECONDS— the timeout for Data Discovery tasks
You can only modify Data Discovery timeouts directly in the repository. Only change this value if you have a strong reason to do so — increasing Data Discovery timeouts can lead to prolonged loading times when testing a connection.
Individual timeout configuration
You can also configure individual timeout values per data source in your Connections tab. These values override global settings.
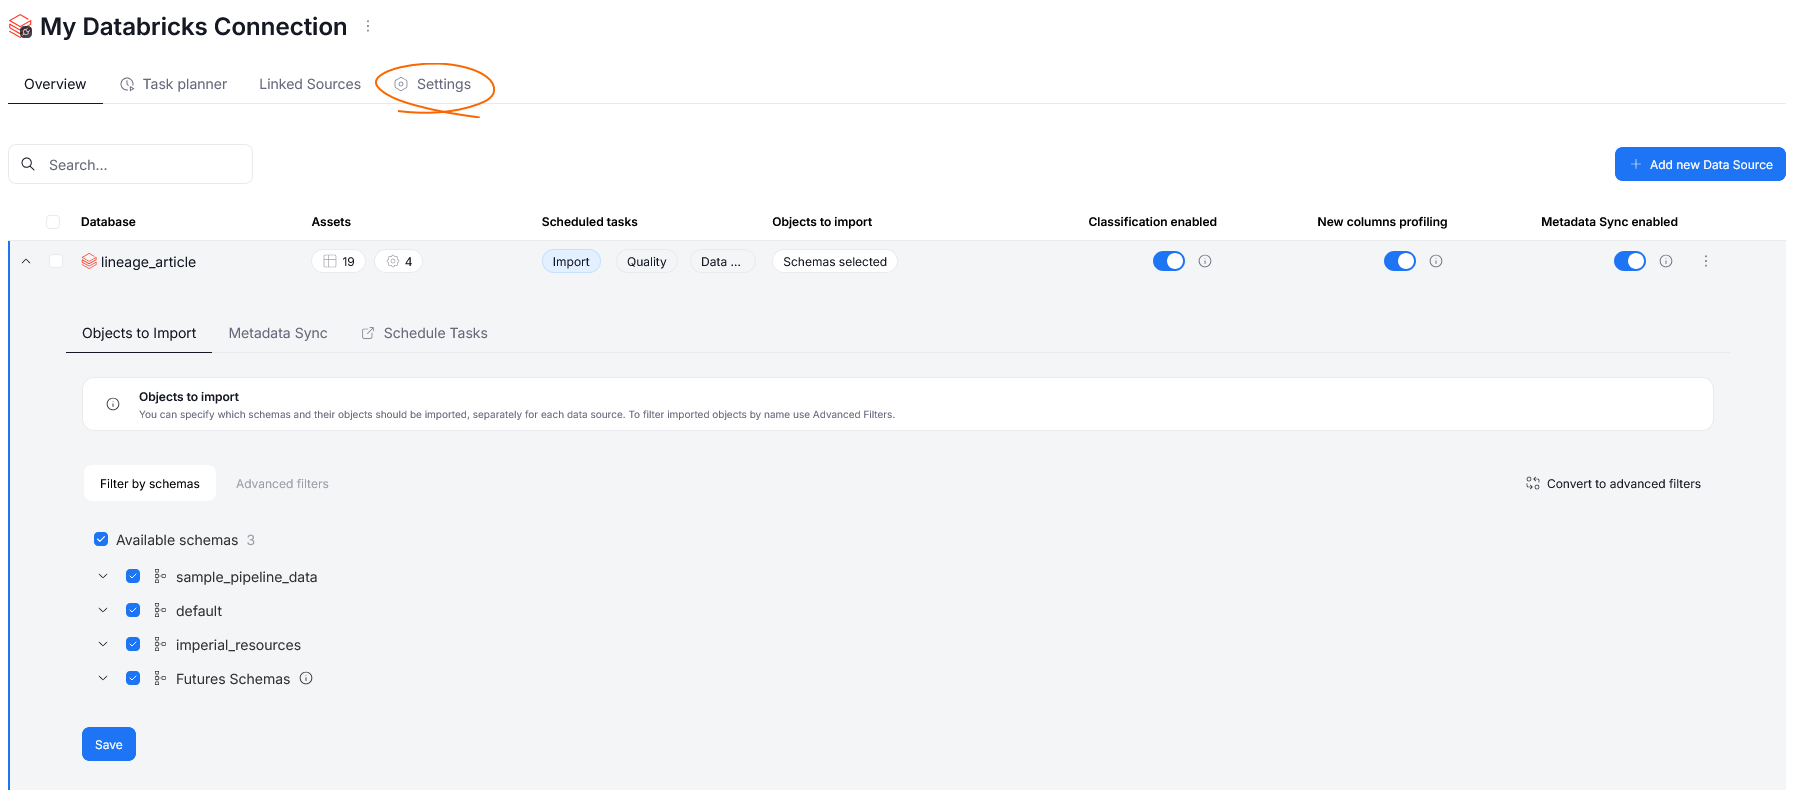
First, go to Connectors>Connections and select the data source you want to modify. Once you are in its view, navigate to Settings.
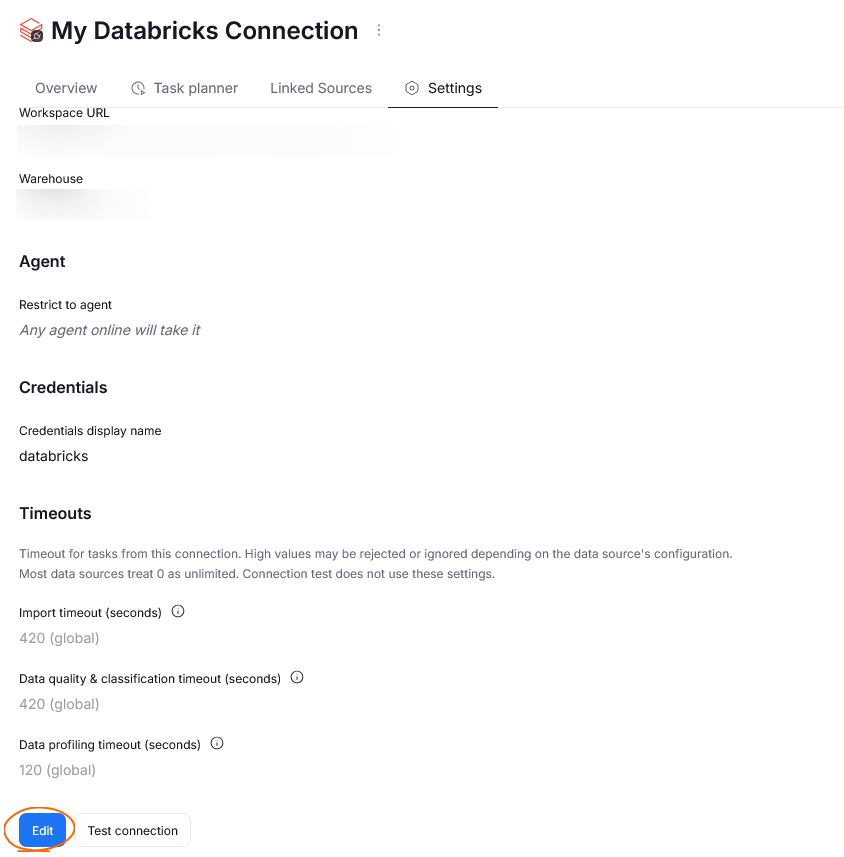
Then scroll all the way down and select Edit.
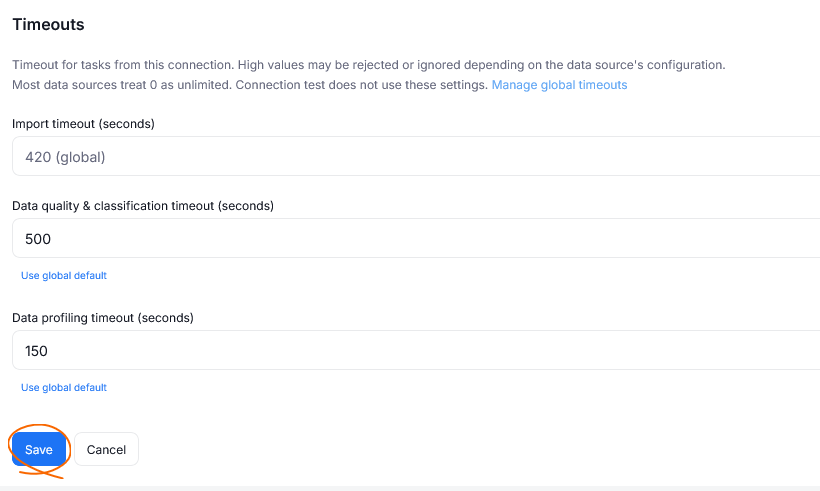
You will see the option to overwrite timeouts for different tasks for this data source only. Remember to Save your changes.
Timeouts during first import
When establishing a connection to a data source, you can set custom timeouts immediately. To do so, use the Advanced settings section on the page where you provide host details. You need to manually unfurl this section using a toggle.
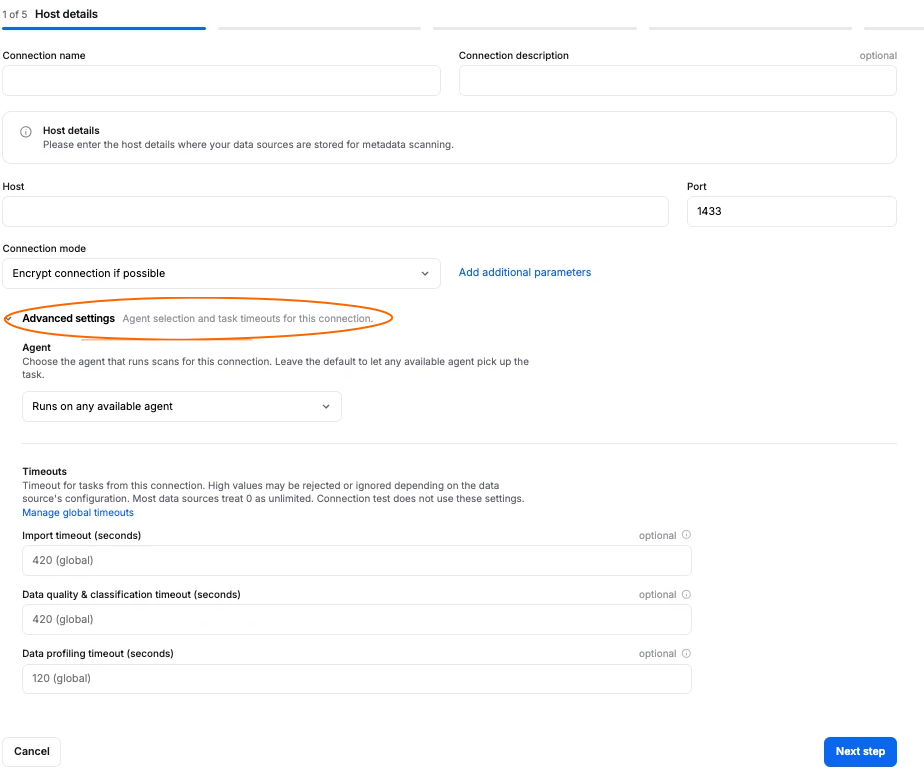
This opens up additional fields, where you can define:
- Agent [A] — the agent that will handle this task. By default, a task can be executed by any agent.
- Timeouts [B] — individual timeouts for specific task types
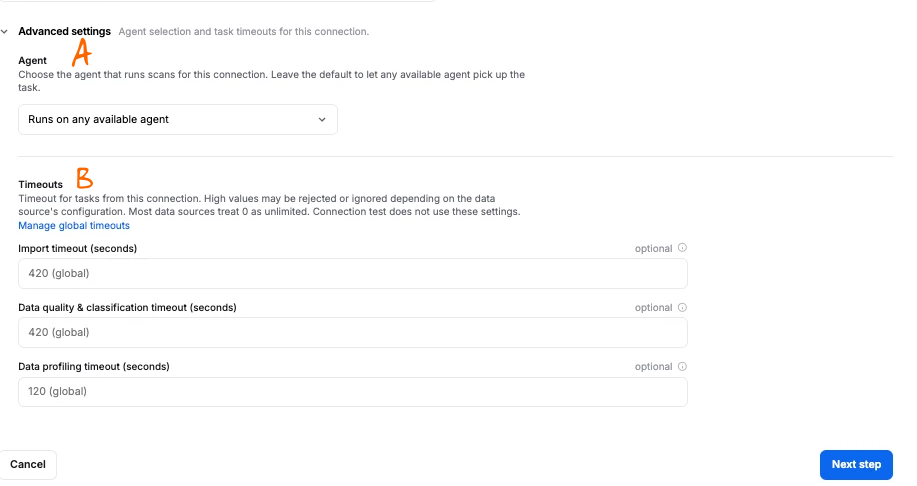
For ODBC connectors, an agent selection is mandatory, since they require a dedicated agent with a full list of drivers. As such, the agent will have to be provided in the general host details, and Advanced settings will let you configure only the timeouts.
Tips and Tricks
When to change timeouts
- Import — increasing this timeout is often necessary and is generally safe to do, for example when you are working with an unusually large database
- Data Quality and Classification — increasing this timeout is fine as long as you add rules deliberately, with the size of the objects they run against in mind. If rules are added without considering object size, you risk extending Data Quality tasks to an unreasonably long time
- Data Profiling — increasing this timeout is strongly discouraged. See Potential Risks for more information.
- Discovery timeout — you should almost never increase the discovery timeout in your database, as it can lead to unexpected crashes or overlong discovery times. You can lower it, if you want to limit the discovery times.
Setting a timeout to 0
If you find yourself increasing a timeout repeatedly and still running into the limit, you can try setting a timeout value to 0. Some connectors treat 0 as an infinite value, meaning the task will not be aborted regardless of how long it runs. Whether this approach works depends on the connector's underlying driver, so not every connector supports it.
If the connector you are using does not treat 0 as an infinite value, saving the setting will not raise any errors. Instead, the next task using this limit will fail with an error once it runs. If you notice this happening, revert back to a numeric timeout value.
Potential Risks
Increasing the Data Profiling timeout is strongly discouraged. Tables that are already timing out, or close to it, are usually the ones responsible for a slow profiling run in the first place, so raising the timeout tends to make the problem worse rather than solve it.
For example, take a large table with 100 columns, profiled with 5 queries per column. If every column times out after 5 minutes, that is 100 × 5 × 5 minutes, or about 2500 minutes — roughly 42 hours. There are certain guardrails in place to prevent such long executions - profiling runs in parallel, and Dataedo Agent stops running further queries on an object once several of its columns or queries have already timed out. Even so, most of the time cost of a slow profiling run comes from a handful of massive objects, meaning that the built-in Agent termination might not trigger. Therefore we advise caution when increasing Data Profiling timeouts — if anything, consider lowering it rather than raising it.
The same risk applies to Data Quality and Classification timeouts when rules are added without regard for object size. In that case, waiting for rules to time out can end up consuming most of the profiling time.

